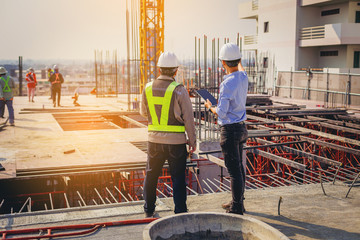
Water damage is one of the most common and costly problems that property owners face. Whether caused by natural disasters, plumbing failures, roof leaks, or flooding, water intrusion can compromise the structural integrity of a building, damage personal belongings, and create a breeding ground for mold and other hazardous conditions. Acting quickly and relying on professional All Pro Services is crucial to mitigating losses, restoring safety, and recovering your property efficiently.
Understanding Water Damage and Its Impact
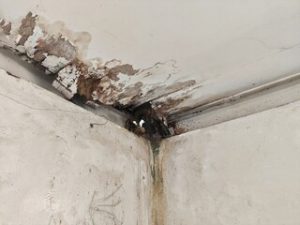
Water damage occurs when excess water infiltrates a structure, either gradually or suddenly. The effects can vary depending on the source, duration, and severity of the intrusion. Immediate concerns include soaked walls, carpets, furniture, and flooring. Over time, untreated water damage can weaken structural components, promote mold growth, and lead to costly repairs.
The impact of water damage extends beyond physical destruction. Mold growth can begin within 24 to 48 hours in damp conditions, posing serious health risks such as allergies, respiratory problems, and infections. Water damage can also compromise electrical systems, resulting in safety hazards. Recognizing the urgency of professional remediation is essential for property preservation and occupant safety.
Common Causes of Water Damage
Water damage can originate from various sources, each requiring different remediation approaches. Some common causes include:
- Plumbing Failures – Burst pipes, leaking faucets, and sewer backups are frequent causes of water damage in residential and commercial properties.
- Natural Disasters – Heavy rains, hurricanes, and floods can overwhelm drainage systems and infiltrate buildings.
- Roof Leaks – Damaged or aging roofs allow rainwater to seep into attics, ceilings, and walls.
- Appliance Malfunctions – Washing machines, water heaters, and dishwashers can leak or overflow, causing water damage in homes and businesses.
- HVAC System Failures – Air conditioning units and condensate lines can produce water leaks if not maintained properly.
Understanding the source of water intrusion is vital for developing an effective remediation plan and preventing future occurrences.
The Importance of Professional Water Damage Remediation
While minor water spills can sometimes be addressed by property owners, professional water damage remediation services offer significant advantages. These experts combine specialized equipment, technical knowledge, and experience to ensure rapid and thorough recovery.
1. Fast Response
Time is critical in water damage situations. The longer water remains in contact with building materials, the more severe the damage becomes. Professional remediation teams respond quickly to assess the situation, remove standing water, and initiate the drying process, minimizing property loss and preventing secondary damage.
2. Advanced Equipment and Techniques
Professional services utilize industrial-grade pumps, dehumidifiers, air movers, moisture meters, and thermal imaging cameras. These tools allow technicians to detect hidden moisture, monitor drying progress, and ensure that all affected areas are completely restored. Advanced drying techniques prevent mold growth and structural deterioration.
3. Comprehensive Restoration
Beyond water extraction, remediation services provide a complete recovery plan. This includes drying, cleaning, sanitizing, and restoring affected areas. Damaged materials, such as carpets, drywall, and insulation, may be replaced or repaired. Proper restoration ensures that the property is safe, functional, and aesthetically restored to its pre-damage condition.
4. Mold Prevention and Remediation
One of the most critical aspects of water damage recovery is mold prevention. Professionals identify areas at risk, remove contaminated materials, and apply antimicrobial treatments to inhibit mold growth. Timely remediation prevents health hazards and avoids additional expenses associated with mold remediation.
The Water Damage Remediation Process
Professional water damage remediation follows a systematic approach to ensure effective recovery. The process typically includes several key steps:
1. Inspection and Assessment
Technicians conduct a thorough inspection to determine the extent of water damage. Moisture levels are measured, affected areas are identified, and the source of water intrusion is located. This assessment forms the basis for the remediation plan.
2. Water Extraction
Standing water is removed using pumps, wet vacuums, or other specialized equipment. Rapid extraction minimizes structural damage and reduces the risk of mold growth.
3. Drying and Dehumidification
Once water is removed, the drying process begins. Industrial air movers and dehumidifiers circulate air and remove residual moisture from walls, floors, and structural components. Moisture meters and thermal imaging cameras are used to ensure complete drying.
4. Cleaning and Sanitizing
Affected areas and contents are thoroughly cleaned, sanitized, and deodorized. This step removes bacteria, contaminants, and unpleasant odors caused by water damage. Upholstery, carpets, and personal belongings may be treated to restore them to a safe and usable condition.
5. Restoration and Repairs
The final step involves restoring the property to its pre-damage condition. This may include replacing drywall, flooring, insulation, or other structural components. Professional remediation ensures that repairs are completed efficiently and effectively, providing long-term protection against future water damage.
Types of Water Damage
Water damage is often categorized based on its source and contamination level, which influences the remediation approach:
- Clean Water Damage – Originates from uncontaminated sources, such as broken pipes or rainwater. It can typically be managed quickly and safely with standard drying methods.
- Grey Water Damage – Comes from appliances, sinks, or washing machines and may contain contaminants or bacteria. Grey water requires proper cleaning and sanitization to prevent health risks.
- Black Water Damage – Results from sewage backups, floodwaters, or heavily contaminated sources. This type of damage poses serious health hazards and requires specialized containment, removal, and sanitation techniques.
Professional remediation ensures that each type of water damage is handled appropriately, protecting both property and occupants.
Preventive Measures to Minimize Water Damage
While professional remediation is essential for recovery, preventive measures can reduce the likelihood and severity of water damage. Property owners should consider:
- Routine Plumbing Maintenance – Inspect pipes, fixtures, and water heaters regularly for leaks or weaknesses.
- Proper Drainage and Gutter Maintenance – Ensure that rainwater is directed away from the property using gutters, downspouts, and proper grading.
- Appliance Inspections – Check washing machines, dishwashers, and HVAC systems for leaks and maintain them regularly.
- Roof Inspections – Inspect roofing materials for damage, wear, or leaks to prevent water intrusion.
- Moisture Monitoring – Install moisture sensors or water leak detection devices to identify problems early.
Proactive measures minimize the risk of significant water damage and reduce the need for emergency remediation.
Choosing the Right Water Damage Remediation Service
Selecting a professional water damage remediation service ensures that recovery is fast, thorough, and safe. Consider the following factors when choosing a service provider:
- Experience and Expertise – Look for companies with extensive experience in water damage restoration and knowledge of industry standards.
- Response Time – Rapid response is critical to minimize damage and prevent mold growth.
- Advanced Equipment – Professional services should have access to industrial-grade pumps, dehumidifiers, and moisture detection tools.
- Comprehensive Services – Choose a provider that offers water extraction, drying, cleaning, sanitizing, and restoration under one roof.
- Customer Reviews and Credentials – Verify reputation, certifications, and client feedback to ensure reliability and quality service.
A reputable service provider ensures efficient recovery and provides peace of mind that your property is in capable hands.
Water damage poses a serious threat to the safety, functionality, and value of any property. From minor leaks to severe flooding, timely intervention is essential to prevent structural deterioration, mold growth, and costly repairs. Professional water damage remediation services offer fast, effective, and comprehensive solutions to restore properties and ensure long-term protection.
By relying on trained experts with advanced equipment, property owners can benefit from rapid water extraction, thorough drying, cleaning, and restoration. Preventive measures, such as proper plumbing maintenance, roof inspections, and drainage management, further reduce the risk of water damage.
Investing in professional water damage remediation services is not just about recovery—it is about safeguarding your property, protecting health and safety, and restoring peace of mind. Whether responding to a sudden flood or addressing ongoing leaks, professional remediation ensures a thorough, reliable, and effective property recovery process.